Many people who don’t have apple corers, core apples by cutting in quarters and then slicing the entire core out of each quarter. While this is a cool apple coring technique, it is still slow and results in awkwardly shaped apple pieces and uneven sizes of apple.
Here are the best apple coring techniques out there, these methods are especially useful when you don’t have an apple coring tool and have to deal with lots of fruit.
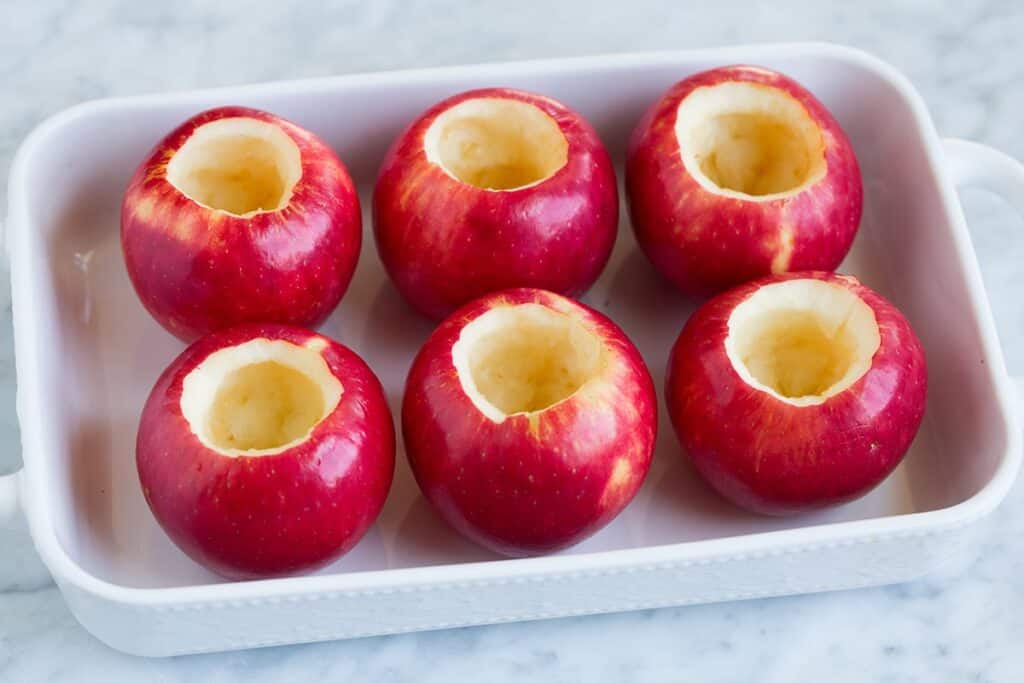
How to Core an Apple Without a Corer?
Check these methods, and choose the right one for you.
Method #1: Core the Apple with a Knife
The first method to core apples without an apple coring tool is to use a paring knife or butter knife.
Tools
- Cutting board
- Paper towel
- Paring knife
Steps
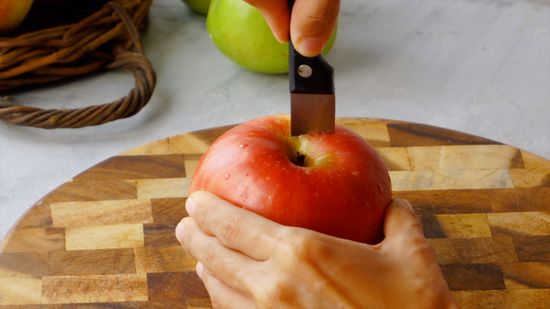
1. Place the Apple Properly
- Place paper towels over a flat surface under your cutting board to keep it in place, so that your cutting board doesn’t slip while dealing with a sharp knife
- Put the fresh apple upright on the board with the stem facing up.
- Poke the serrated edge tip within it around 1⁄4 inch (0.64 cm) far from the stem. Keep in your mind that your aim is the area where the core ends not near to the stem, otherwise, the core could be punctured. This all will cause a mess that you will have to clean later.
If you don’t have a paring knife, any thin blade can get the job done. A thin peeling blade will limit the apple’s flesh from ruining the apple core. (check our list of the best cheap paring knives)
2. Push Your Blade the Whole Way Along the Apple
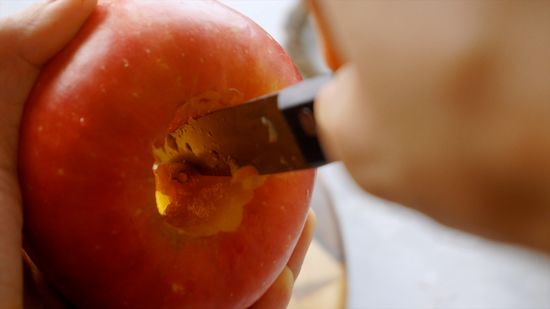
- Grip your knife steady. Then, push the blade straight down. Make sure the blade won’t go within the core.
- Keep an eye on the knife’s sharpened end while coming through the bottoms of apple. Turn your good-sized apple for a second to look at the place your blade is going out.
Using a longer blade will make the task much easier. It will help you will take off the whole core in one go.
3. Separate the Core by Cutting the Whole Way Around It
- Grip your apple steady, and then carefully cut in circular motions and make sure not to slice into the core. Maintain your blade 1⁄4 inch (0.64 cm) far from the stem. Leaving your core loose within the apple and ready for you to take it off.
- Keeping a consistent cut the whole way on all sides of the stem will be hard. So try to make extra incisions by putting your blade on a different side of the stem, then start pushing it the whole way through the bottom once more.
- Repeat the previous step 4 times on every side of the stem, then continue slicing in a circle to link all the incisions.
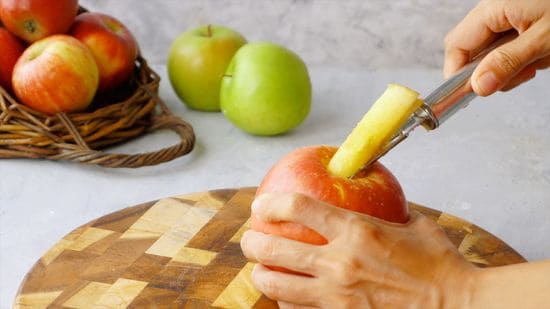
4. Push Out the Core with Your Thumb
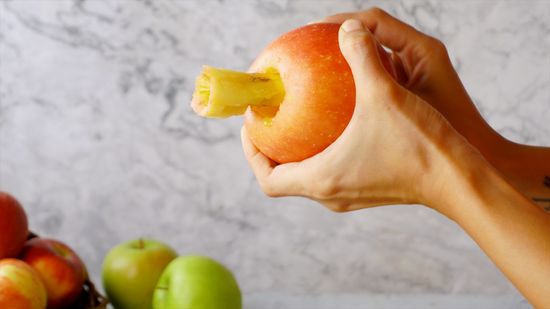
- Slowly remove your blade. And make sure not to lose control of it.
- Put it aside. And push the stem hard. The core will get out from the apple bottom. If the core is stuck within the apple, cut around it once again.
- Grip the core firmly, then pull it up and take it off.
5. Remove the Remaining Seeds Inside
Sometimes, those portions separate from the core and remain behind in it to core an apple without an apple peeler blade.
- Insert your blade tip again into the cavity.
- Then, keep scraping on all sides of the outer edge.
- Push the seeds through the apple holes. And voila! the apple is ready for your yummy recipe.
Method #2: Scoop the Core from the Two Halves of the Apple

Tools
- Cutting board
- Sharp knife
- Spoon or a melon baller
- Mat or towel
Steps
1. Put the Apple on a Stable Cutting Surface
- Put your bunch of apples on the board with the stem side up and a towel or mat underneath the board for making each apple steady.
2. Divide the Apple Into Two Halves to Uncover the Core
- Cut through the apple vertically, and turn the apple halves flat onto the cut side.
- Then, slice each one from the upper to the end from the center. Try slicing it from its center with a single movement. You will go through the apple core, but it’s okay.
3. Scoop The Core from Apples
- Lay the apple halves flat on the board with the skin facing down. By that, you will have a complete view of the seeds. Besides, you will see the fibrous sheaths in the middle of every part.
- Use a melon baller or spoons to dig within the flesh of the apple.
- Spin the quarter around.
- Then, cut the entire core center from the other part to remove the apple core entirely.
- You can use paring knives to cut underneath the core to remove it. Do a diagonal cut down to the middle spot underneath the apple core.
4. Use a Paring Knife to Cut the Bud and Stem from the Two Parts
- Put each half on the board with the skin facing down
- The bud and stem are on every half end above the removed center. Grasp the blade parallel to those portions. Then do a diagonal cut down underneath them. And a diagonal slice down from the opposite part to take off all the inedible portions.
You will have to do 4 cuts on every half, 2 for every bud and stem. and then you will be all set to prepare your favorite apple dessert recipe
Watch this video tutorial to learn how to easily core an apple using a knife and spoon.
Another way to core an apple without an apple slicer is using a spoon or a melon baller to scoop out the stem and bud.
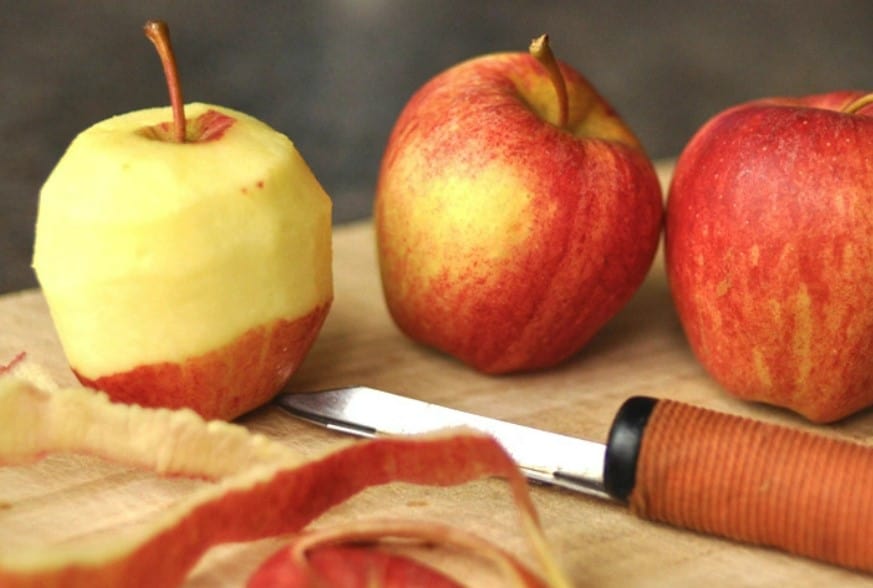
Method 3: Separate the Core from Peeled Apples
Tools
- Paring knife
- Peeling blade – Apple peeler machine
- Cutting board
- A damp towel or a non-stick mat
Steps
1-Peel the apple using an All-in-One Apple Peeler
- Peel the apple from top to bottom to take off a layer of the surface. Keep peeling till you expose all the flesh.
- You can still peel the apple with a chef’s knife, you will just need to log the blade tip underneath the fruit surface.
- Peel along the whole fruit. Be sure to move slowly to maintain your blade tip as nearer to the surface as you can.
2. Place the Apple on a Flat Surface, and Keep the Stem facing Up
- For more safety, put damp towels or a non-stick mat underneath the board.
3. Slice Across Your Apple to Disconnect a Portion from the Stem
- Hold your sharp chef knife and keep it about 1⁄4 inch (0.64 cm) far from the stem.
- Cut straight down till you reach the bottom, to separate a portion from the fruit.
- Slice nearer to the stem as possible to prevent wasting a lot of flesh.
4. Rotate the Fruit to Slice the Remaining Sides to Take Off the Core
- Turn the item till the uncut part is facing you.
- Slice across it once more. After that, cut the whole way down towards the bottom.
- Maintain your sharp blade 1⁄4 inch (0.64 cm) far from the stem. So you can prepare even cuts.
Take a look at this excellent tutorial that shows you how to peel, core and slice apples with ease.
More yummy tips and tricks related to apples.
1-Select The Apples Wisely
- Some apple kinds opt for turning brown over other ones. Therefore if you plan to cut them up, select a type that is less prone to brown.
- Some studies of apple browning showed that Granny Smith apples have minimal browning.
- While in the middle were the Golden Delicious ones. And the type that is browned the most is the Red Delicious type.
2-Store The Cut Apple Correctly
The best method to store apple cuts is to use Ziploc bags.
Steps
- Step 1– Put the cuts within Ziploc bags.
- Step 2– With your mouth, keep drawing the air from the bag.
- Step 3-Seal the bag three-quarters long
- Step 4-Then put them in the refrigerator till you want to eat them. The segments will remain crisp and fresh.
3-Use Good-Quality and Clean Knives
If you use old knives, The organic acids may corrode them, leaving iron salt deposits on the fruits’ segments. Those deposits will significantly accelerate the oxidation process.
This will turn them brown more quicker. Therefore working with high-quality, clean knives can help to slow the oxidation process.
4-Disguise the Browning

If the fruits have a little brown already, you can spray a little cinnamon on the sides of your apple cuts. This step will somewhat disguise the browning.
The cinnamon flavor complements the apple taste nicely. Moreover, the reddish-brown color could hide the brown color.
Besides, this material is considered a light antioxidant. Therefore if you sprinkle it lightly, it helps to stop any further browning.
Those preservation ways are not for apples only. You can use them for any fruits which are opting for browning. like, banana, pear, peach, and avocado.
FAQ about How to Core an Apple Without a Corer?
1. How can you rehydrate dried apples?
For rehydrating dried apples, all you need to do is to soak them in hot liquid. Use a cup of liquid for every cup of dried apples.
And then heat the water or apple juice in a pot till it boils. Finally, turn off the heat, and put your dried apple slices into the pot
2. Can you submerge apples in water overnight?
Clean tap water is just like lemon juice, and Citric Acid. They all stop apples from browning.
Submerging the cuts in cold running water is of the easiest methods to stop browning. The water will reduce the air amount. As a result, it reduces the oxygen that will reach it.
3-Are Gala Apples suitable for baking?
Gala apples have a good sweetness and a crisp bite. It can complement each recipe. Also, using it in baking will help you to use less sugar.
This feature is connected with their natural sweetness. The crispy feature will help to keep its form throughout baking. So it will not become mealy.
4. What apples last the longest?
You can store all types of them. But some of them do store better than other ones. The hardy ones are the best type for storing.
It holds up well for a long period, such as Granny Smith, Fuji, Gala, and Red Delicious. One of the general rules of apple storage is storing them unwashed within the refrigerator’s coldest area.
Can you core an apple with a corkscrew?
Yes, you can.
Take a clean, dried apple and insert the corkscrew tip into the top of it. Twist the corkscrew as if opening a bottle of wine. Pull down the wings after pressing the button, the core will suddenly appear and you will have a perfectly cored apple.
How do you cut an apple without apple slicer?
Place the apple on a cutting board, with the stem body up. Then make a 12-inch cut to the right or left of the stem and cut all the way down with a sharp knife, while keeping a close eye out for the core.
Finally, you need to turn the apple 90 ° and cut a similar pattern all the way through it.
Should I remove apple skin?
It is not recommended.
By peeling apples, you are actually sacrificing the powerful apple nutrition benefits.
One medium (three-inch-diameter) unpeeled apple has nearly double the fiber, 25% more potassium, and 40% more vitamin A, according to the USDA National Nutrient Database.
Can you core an apple without a corer?
Yes, you can.
There is no doubt that an apple corer is a very useful tool. However, it is not necessary to have one to be able to successfully core an apple. A spoon and a sharp knife can still do the job perfectly.
What’s the easiest way to core an apple?
Cut the apple into four equal apple pieces. To begin, place the apple upside on a cutting board.
Then, with a sharp knife, cut the fruit in half through the core. Finally, along the stem axis, cut each of these halves in half, this way will successfully turn the apple into quarters of even size and shape.
Is apple corer useful?
A corer that peels and slices at the same time can help you save time. This will be especially useful if you frequently make apple pie, apple cake and other baked apple recipes.
Final Thoughts
Whether you eat the apple raw or you want to use it in baking, the apple core will always get in the way. So whatever you will use the apples for, coring it will simplify the task.
And now you reached these few lines in our handy guide, we expect you to know how to core an apple without a corer.
If you have any other tips and tricks related to apples, feel free to share them with us in the comment box below.